Rannnalla pitää tietysti olla hiekkaa! Teoksen pohja on puuta ja täysin tasainen. Täysin tasainen hiekka ei houkuttanut. Mietin pitkään, miten saisin siitä jotakuinkin oikean hiekkarannan näköisen. Netistäkään ei ollut apua tai sitten en vain löytänyt ohjeita.
Ennen kuin "hiekoittaisin" koko kioskin ympäriston, päätin kokeilla onnistuuko aito hiekkaranta yhdistelemällä DAS-massaa, liimaa ja kahden erilaisen hiekan sekoitusta ripauksena rikottuja simpukankuoria. Alla lopputulos ohjeineen.
The beach must have sand, right? The base of my seaside stall is made of wood and thus, it's completely flat. I could've covered the base with sand but it wouldn't have looked like a real beach at all. I searched the web on how to create a realistic looking miniature beach but I couldn't find any instructions.
So, I wanted to experiment if an almost real-looking beach can be achieved by using DAS air dry modelling clay, glue, and a mixture of two different types of sands with broken seashells. Below you will find how it turned out and instructions on how to do this .
1. Levitä haluamasi määrä DAS-massaa vaikka pahvin päälle ja kauli se tasaiseksi. Massa ei tartu pahviin.
2. Tee massaan pieniä painumia esim. nukkekotinuken jallalla. Päällystä jalka kelmulla, jotta massan väri ei tartu nuken jalkaan.
3. Anna kuivua yön yli.
1. Take a piece of DAS clay and flatten it using a rolling pin (used for crafts only!) e.g. on a piece of cardboard. The clay won't stick on the cardboard.
2. Make small dents into the clay. I used a dolls house doll's foot wrapped in cling film to do this.
3. Leave the clay to dry according to the instructions on the clay package.
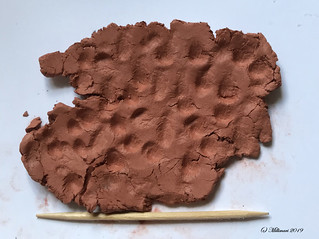
Tältä massa näyttää painaumilla. / Here's the clay with the dents.
Kun massa on kuivunut, jatka näin:
4. Sekoita hieman vettä liimaan, jotta massaan tehdyt kolot eivät täyty paksusta liimasta.
5. Levitä ohut kerros liima-vesiseosta siveltimellä massan pinnalle.
6. Ripottele hiekka-simpukankuorisekoitusta päälle.
7. Anna kuivua.
When the clay has dried, continue as follows:
4. Mix a bit of water into the glue. Thick glue would cover the dents in the clay, which is not what we want.
5. Use a brush to spread a thin layer of the glue on the clay.
6. Sprinkle the sand-seashell mixture onto the clay.
7. Let it dry.

Hiekka-simpukankuoriseosta massan päällä. Osa kuorista jäi hieman liian isoksi.
This is what the clay looks like with sand and seashells some of which are a little too big, though.
8. Kun hiekka on kuivunut, kaada ylimääräinen hiekka pois. Jos hiekkaa jää niukalti massan pintaan, toista kohdasta 5 alkaen uudelleen.
8. When the sand has dried, pour the extra sand away. If the layer of the sand remains fairly thin on the clay, repeat the procedure starting from instruction #5.

Ja tässä lopputulos. Hiekka-simpukankuoriseosta on ripoteltu kahteen kertaan massan pinnalle. Ei ehkä täydellistä mutta luonnollisemman näköistä kuin täysin tasainen pinta. Tämä metodi sopii pieneen alueeseen mutta isommalle alueelle levitin liimaa välillä tasaisemmin ja välillä isomman kasan ja molempien päälle hiekka-simpukankuoriseosta. Ei huono vaihtoehto sekään.
This is how the end result looks like. I've sprinkled two layers of the sand-seashell mixture on top of the clay. It may not be perfect but it does look more natural than a flat layer of sand on the wooden base. This method works well with small areas that need a sand layer but at the end of the day, as my surface was quite a bit larger, I spread glue flatly here and there and then a heap of glue at other areas. Then I sprinkled the sand-shell mixture onto the glue. That worked quite well, too.
19.7.19
Kioski: Hiekka - Seaside stall: Sand
Subscribe to:
Post Comments (Atom)
1 comment:
For the surrounds of your seaside stall, this will be great. Thank you for the tutorial.
Hugs, Drora
Post a Comment